filter by keyword or browse by category
- About ClassGRIT Games
- Accessing Games Purchased on TpT
- Redeeming a Purchase
- Finding TpT Order Number and Item Id
- Launching a Purchased Game
- Accessing Games via a Subscription
- Playing a Game
- Choosing a Question Set
- Launching a Game
- Sharing a Game with Students
- Creating Your Own Question Set
- Using the Advanced Editor
- Adding and Editing Text
- Inserting Math Equations
- Adding Images
- Using Templates
- Building a Question Set in PowerPoint
About ClassGRIT Games
Our web-based educational games provide a fun and engaging way to review material for any subject or grade. You can choose from one of the many pre-made question sets in our growing library or create your own question set to meet the needs of your students.
Our games work on a wide variety of devices including interactive whiteboards, computers, laptops, Chromebooks, iPads, tablets, and even phones!
Need help?
Contact us at help@classgrit.com or through our Teachers Pay Teachers store.
Accessing Games Purchased on TpT
If you have purchased a digital game or license from our store on TeachersPayTeachers.com, you will access that game from the My Purchases page once you have added the game to your ClassGRIT account.
Redeeming a Purchase
Purchases of digital products made on Teachers Pay Teachers from the ClassGRIT (Math in the Middle) store can be easily added to your account by following the steps below:
- Create a free ClassGRIT account or sign in
- Go to the My Purchases Page
- Click "Add Order"
- Enter the TpT Order Number from your TpT receipt. Instuctions on how to find the order number can be found below.
Once the product has been added to your account you can launch the game by selecting "Play" and then either "Original Game" or "Choose Game Type" if you want to try this question with a different game type.
Finding TpT Order Number and Item Id
To find your TpT order number and Item Id, go to https://www.teacherspayteachers.com/My-Purchases. Scroll down until you see the ClassGRIT interactive game, bundle of games, or license that you purchased and click on “view receipt” next to that game.
If this was a free product you will not have an order number, but the resource should be available on the Free Question Set tab
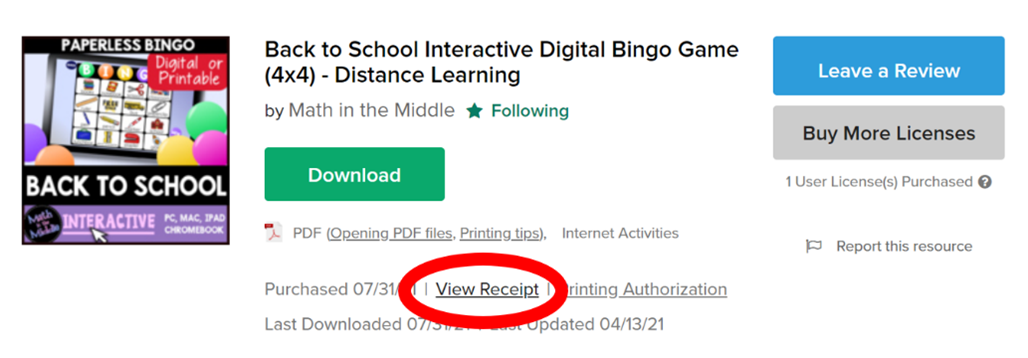
Towards the top of your receipt, on the left-hand side, you should see “Order Number”.
Next to each purchased product you should see the Item ID.
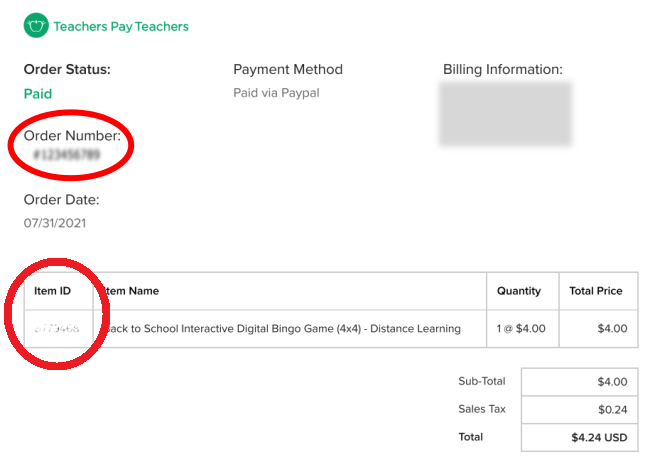
Copy the number that comes after the number symbol (#), and paste that in the Order Number field and copy the number next to the Math in the Middle purchase into the Item Id field on the “add order” screen of the ClassGRIT My Purchases page to add the game, games, or license time to your account.
If you have multiple products on one receipt you can just add them one at a time, reusing the same Order Id number, but changing the Item Id for each product
Launching a Purchased Game
Go to the My Purchases page. You will see a list of all the games you have purchased from TpT that you added to your account. Scroll down to the game you want to play and click "Play" and then either "Original Game" or "Choose Game Type" if you would like to try the Question Set with a different game type.
Accessing Games via a Subscription
A subscription to ClassGRIT grants you access to play all the games in our library and allows you to create your own question sets, as well. Subscriptions can be purchased from our TeachersPayTeachers.com store for various lengths of time (i.e. 1 month or 1 year).
Playing a Game
ClassGRIT has two main types of games: stand-alone games and games that support question sets.
The stand-alone games can be accessed from the Games page. Simply click on the game you want to play (i.e. “Attack”) and click the "Play" button on the details screen.
To play a game that supports question sets, you first need to select the question set you want to use. Read “Choosing a Question Set” for more information.
Choosing a Question Set
Go to the Question Sets page to search our extensive library of pre-made question sets. The Question Sets page contains a search box where you can type in keywords or use the filters (grade, subject, category) to search for the type of questions you are looking for.
Below the search and filter box, you will see options for Community Question Sets, My Question Sets, and Favorites. The site defaults to searching the Community Question Sets, which are a mix of sets created by Math in the Middle and sets created by other teachers using the site subscription. By clicking on My Question Sets, you can see all of the sets that you have created, (which you can learn more about in the Creating Your Own Question Set section of this help file). Favorites lets you browse through the question sets that you have marked as “favorites”.
After you have searched or filtered questions on the Question Sets page, a list of resulting question sets will be generated. Each result in the list will show you the name of the question set, subject, category, grade level, and author. It will also say “has categories” if the questions in the question set are categorized, as some game types (i.e. game show and claw machine) are best suited for games with categories, though they will work with any games. You can click the “favorite” button on any question set to save it as a favorite, which will make it easier to find in the future on your Favorites page.
By clicking on a question set you can view all of the questions and answers included in that question set. If you decide you want to play a game using that question set, you can click “play”, or if you prefer to keep browsing you can go back to the previous page by clicking the “back” button.
Launching a Game
Once you find a question set you want to use, click “play” to choose which game type you would like to use. Click “play” on the game type of your choice. Please note that some game types have a “view games” button instead of a “play” button, as they have additional options for you to choose. For example, if you choose to play a Bingo game, on the “view games” screen, you will need to select the Bingo Caller for you (the teacher) to bring up questions and will need to select either paper or digital Bingo Cards for your students to use in either a 4x4 or 5x5 size (the 4x4 is recommended for question sets with less than 24 questions and the 5x5 is recommended for bigger games). See Sharing a Game with Students for help on having your students access the digital bingo cards.
Sharing a Game with Students
If you are playing Bingo with digital bingo boards or if you would like your students to play any of the other games independently on their devices, you can share the game with them by clicking the “student link” button under the “play” button for all game types. Then copy and paste the link in Google Classroom or any other Learning Management System you use for your students to access. You students will not be asked to sign in and do not need ClassGRIT accounts to play the games using the link you send them. They simply click the link to play. The link will stay active as long as your subscription is active, so once your subscription to ClassGRIT expires the link will no longer work for your students.
Creating Your Own Question Set
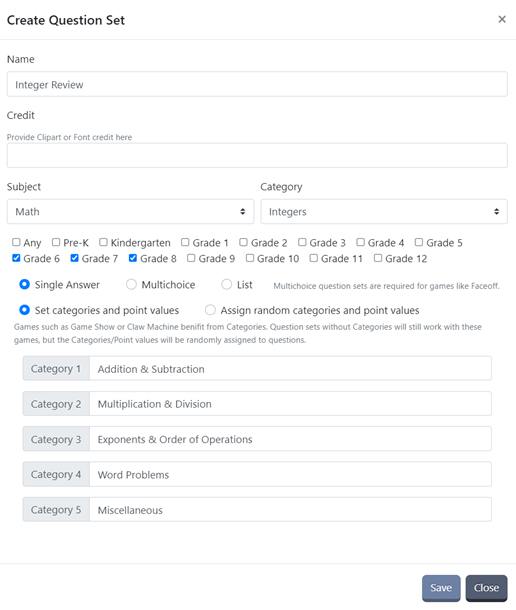
Go to Question Sets and click “+ Create Question Set” to make your own question set for a game. Name your question set based on the topic it covers. If you plan to use commercially licensed clipart or fonts, type the website from which you got them in the credit box. Otherwise, leave this box blank. Select a subject and category from the dropdown lists and choose the applicable grade level(s) for your question set. Choose whether your question set has a single answer for questions or is simply a list with no questions (i.e. a word list that could be used in a bingo game).
Choose whether your question set will be broken up into 5 or fewer categories, or if it will not have set categories. If you choose to have categories, point values will also be generated, allowing you to create a question set where harder questions are worth more points. (Question sets with categories are ideal for games like Game Show and Claw Machine, but question sets without categories can also be used with those game types - the categories and points will simply be randomly selected). If you choose to include categories in your game, type the name of each category in the space provided and then click “save”.
Once you have saved the basic information about the question set, you are ready to start adding questions.
Click “+ Add Question” to create a question. For simple text questions and answers, simply type the question in the question box and the answer in the answer box and then click “save”. The question and answer will automatically resize to fill the screen when you play a game. For questions and/or answers that you want to style or customize more than simple text, click “use advanced editor”. For help with the advanced editor, go to the Using the Advanced Editor section of this help file.
Once you have all of your questions and answers created, click “Publish”. The default mode is for the question set to be “public” so that other teachers can play games using the question set you have created. For most games, “public” is the best option. If the question set would not be useful to other teachers, uncheck the box to make the game private. Then click “publish”.
Once the game is published, you can play the game right away using the “Play” button, or play later. The question set you created will appear on the Question Sets page in the My Question Sets section, as well as the Community Question Sets section if you made the game public. For more information on playing the game, see Launching a Game.
Using the Advanced Editor
The advanced editor allows you to completely customize the way the questions and answers appear in your game. You can add text, images, and some simple shapes using the given tools.
Adding and Editing Text
To add a text box to your question or answer card, click “text” and then type your text. You can move the textbox around on the card and change the font and font size using the drop down boxes. Some commonly used symbols are included in the advanced editor, as well. You can change the background color of the textbox by highlighting the textbox and bringing up the dropdown box titled “Back”. Select the color of your choice and then click “choose” to apply that color to the textbox. Similarly you can change the color of the actual text using the “Fill” dropdown box and can add a border around your text letters/numbers using “Stroke”.
Inserting Math Equations
To create math equations in the advanced editor, you can use the various symbols and textboxes as you see fit, or you can build the equation in a separate program (such as Microsoft Word, using the equation editor). If you choose to build it in another program, save the equation as an image using your computer's Snipping tool or another method of your choosing and then insert it into your question card the same way you would insert any other image. (See Adding Images for more help.)
Adding Images
To add an image to your question or answer card, click “image” and then select a saved image from your computer. The advanced editor will automatically make the image as large as possible to fill the question card, but you can resize it and move it around any way that you like. This is a great way to add complicated math equations (see Inserting Math Equations) to your questions or clipart or other images. (If you choose to use clipart, please be sure that you are using commercially-licensed clipart and include a link in the credit section of the question set information.)
Using Templates
Templates are a great tool for question sets where you want all or some of your advanced editor-created questions to look similar. Simply design one question card the way you want and then click “Template” and “Create Template” to save that question card as a template. Now when you go into the advanced editor for your next question that you want to have a similar design, click “Template” and select the template you previously saved. Then you can edit it/change it however you want for the new question. You can save several different templates so you can have a separate template for questions and answers, or any other way you want to use them. You can delete templates when you no longer need them, as well.
Building a Question Set in PowerPoint
While the Advanced Editor gives you lots of options for customization, some people prefer to build question sets in a different program (such as PowerPoint), that they are more comfortable with. If you want to create your question set in PowerPoint, set the slide size to 7in wide x 5in high in PowerPoint. Create each question on a separate slide and then save your PowerPoint as images (either png or jpg). Then on ClassGRIT, for each question card, open the Advanced Editor, and add your saved question card as an image. (See Adding Images for more help.)
